|
Full Color Spectrum with Smart Color LEDs.
AURA™ Lighting Strips feature Smart Color LEDs, a groundbreaking design that integrates Micro-LEDs in all three primary colors into a single SMD. This innovation achieves a flawless blend of colors at the micro level, resulting in an exceptionally pure and vibrant light output.
Versatility Meets Flexibility.
AURA™ Lighting Strips are incredibly flexible, capable of bending, twisting, and curving around any surface. Encased in a durable silicone housing, each strip offers robust protection against various weather conditions.
True Plug & Play
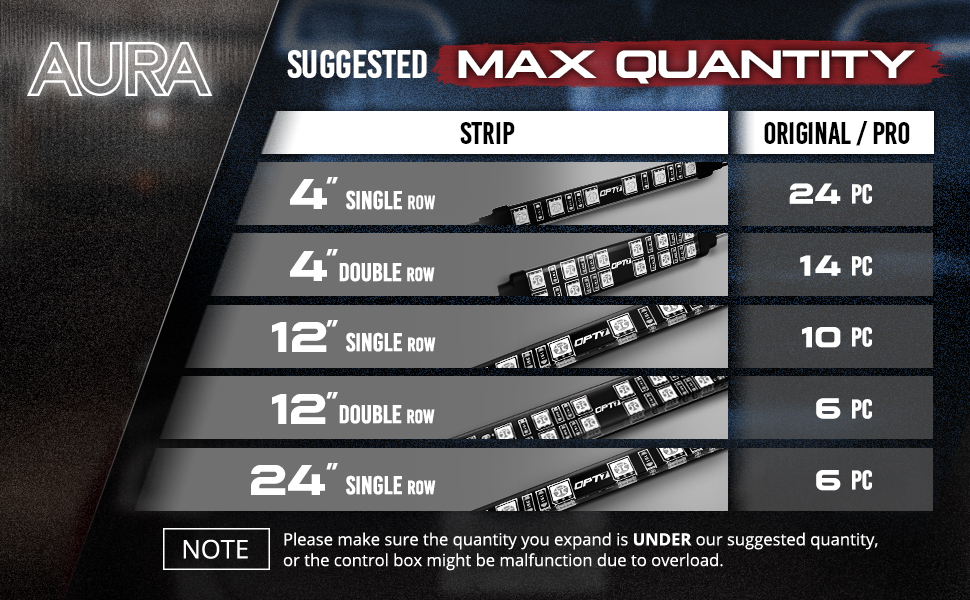
Our expansion pack can be directly connected to any OPT7 AURA™ kit and require ZERO cutting or wiring.
What's Included?
This expansion pack includes:
- 2 x 24" Single Row LED Strip with 4-Pin Round Waterproof Connectors
- 2 x 4-Pin LED Flat to 4-Pin Round Connectors
- 2 x Y-Splitter with 4-Pin Round Waterproof Connectors
- 2 x 10ft Extension Cable with 4-Pin Round Waterproof Connectors
NEED MORE LENGTH for customized installation? Search:
Works With The Following AURA™ Remote Controlled Kits:
12" Strip Length, Width and Height:
- Length: 24"
- Width: 0.5"
- Height: 0.25"
Automotive Adhesive Tape
Our premium strip kit features strong, high-quality binding tape.
Tip on applying adhesive LED strips securely:
1. To prep the area you wish to mount the LED strip, dampen a clean cloth in warm water, then scrub the surface to remove debris. Any grime left behind could prevent the LED strip from sticking, so thoroughly clean the surface until it’s free of dirt and scuff marks.
2. Remove any moisture left over with a clean, dry cloth or give the surface 30 minutes to air dry. Next, use the adhesive booster that we provide to wipe the area for a ready to stick surface.
3. Peel the adhesive backing from one end of the LED strip. Position the LED strip carefully on the desired surface, ensuring proper alignment. Press firmly to secure, working gradually from one end to the other. For best results, avoid repositioning the strip once it's adhered.
4. Align the arrows on the pins to ensure secure connections during installation. This step is crucial as it prevents improper installation, which has been causing color issues for some users.
Warranty Covered:
Includes our free 14 Days Warranty (starting from the order date)
CA Residents:  WARNING: Cancer and Reproductive Harm - www.P65Warnings.ca.gov WARNING: Cancer and Reproductive Harm - www.P65Warnings.ca.gov
|


 WARNING: Cancer and Reproductive Harm -